CS2103T Week 2 & 3
CS2103T Week 2 Topics
Rehash and review of topics based on the CS2103T website here.
Textbook: Software Engineering for Self-Directed Learners CS2103 Edition
Main topics are OOP:
- Software Engineering Intro
- SDLC Process Models: Basics
- RCS: Revision History/Remote Repos -> Revised in my Git Post.
- IDEs
- Automated Testing of Text UIs
Introduction to Software Engineering
Software Engineering is the application of a systematic, discipline, quantifiable approach to the development, operation and maintenance of software.
“Joys of the Programming Craft” -The Mythical Man-Month, Frederick P. Brooks.
Why is programming fun? What delights may its practitioner expect as his reward?
- Sheer joy of making things of own design.
- Pleasure of making things useful to other people.
- Fascination of fashioning complex puzzle-like objects of interlocking moving parts and watching them work in subtle cycles.
- Joy of always learning.
- Delight of working in such a tractable medium.
Not all is delight, knowing the inherent woes make it easier to bear them when they appear.
- One must perform correctly.
- Other people set one’s objectives, resources and information. Dependence upon others.
- Designing grand concepts is fun, finding bugs is just work.
- Seems debugging has a linear convergence, (testing drags on and on)
- Last woe is that the product over which one has labored so long appears obsolete upon or before completion.
SDLC Process Models: Basics
Project Management: SDLC, Software Development Life Cycle. Software development goes through different stages such as requirements, analysis, design, implementation and testing, known collectively as SDLC.
Several approachs, known as SDLC models / software process models that describe different ways to go through the SDLC. Each process model prescribes a ‘roadmap’ for the software developers to manage the dev. effort.
- Roadmap describes the aim of the dev stages, the outcome, and the workflow relationship between stages.
SDLC: Sequential (Waterfall) Model
The sequential model, aka waterfall model, views software development as a linear process.
- Project is seen as progressing through the development stages.
- Waterfall stems from model drawn like a waterfall.
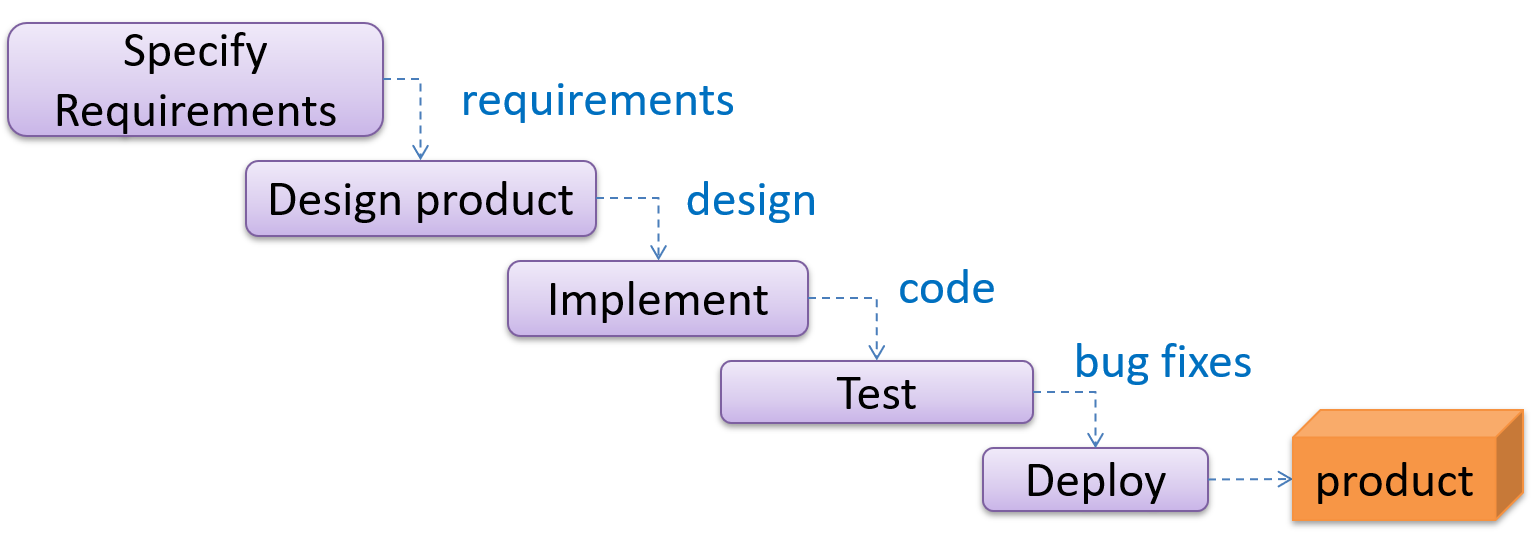
- Completion of one stage produce some artifacts for next stage.
- E.g. Requirements stage produces a comprehensive list of requirements, to be used in the design phase.
- Strict sequential model project moves only in the forward direction.
- E.g. once requirements stage over, no provision for revising the requirements later.
- This model can work well for a project that produces software to solve a well-understood problem, (requirements can remain stable and the effort can be estimated accurately).
- However, real-world projects often tackle problems that are not well-understood at the beginning, unsuitable for this model.
- For example, target users of a software product may not be able to state their requirements accurately at the start of the project, if they have not used a similar product before.
- Easy to track the progress of the project, with each stage having a well-defined outcome.
SDLC: Iterative Model
The iterative model advocates producing the software by going through several iterations. * Each iteration could potentially go through all the stages of the SDLC, from requirements gathering to deployment.
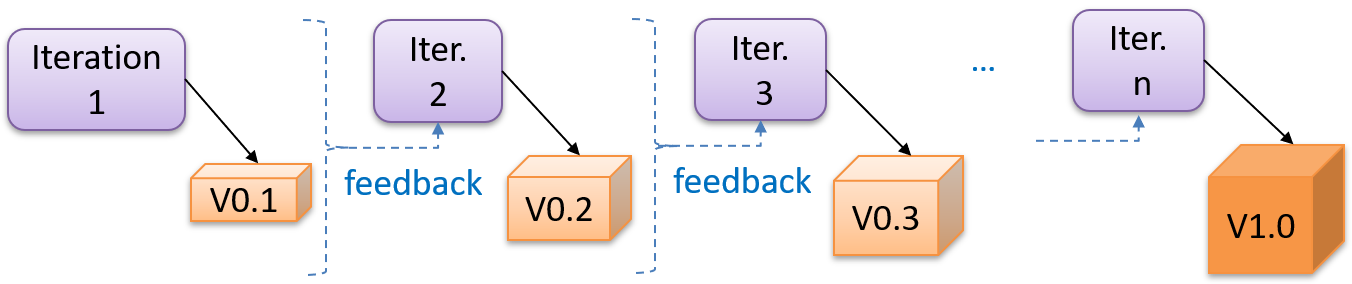
- Each iteration produces a new version of the product building upon the version produced previously.
- Feedback from each iteration factored into subsequent iterations. Feature can be removed / tweaked, effort estimates adjusted.
The iterative model can be done in breadth-first or depth-first approach.
Breadth-First Approach
- In the breadth-first approach, an iteration evolves all major components and all functionality areas in parallel i.e., most features and most components will be updated in each iteration, producing a working product at the end of each iteration.
Depth-First Approach
- In the depth-first approach, an iteration focuses on fleshing out only some components or some functionality area. Accordingly, early depth-first iterations might not produce a working product.
A project can be done as a mixture of breadth-first and depth-first iterations.
RCS and Git
Refer to Git Post.
IDEs: Basic Features
Professional software engineers often write code using Integrated Development Environments (IDEs). IDEs support most development-related work within the same tool (hence, the term integrated).
IDE generally consists of:
- Source code editor including features such as syntax coloring, auto-completion, code navigation, error highlighting, code-snippet generation.
- Compiler and/or interpreter that facilitates compilation/linking/running/deployment
- Debugger that allows execution of program one step at a time to observe run-time behavior to locate bugs
- Other tools e.g. support for automated testing, drag-and-drop construction, version management support, simulation of runtime platform etc.
Automated Testing of Text UIs
Testing as a form of Quality Assurance.
Testing: Operating a system or component under specified conditions, observing or recording the results, and making an evaluation of some aspect of the system or component. –- source: IEEE
Test Cases
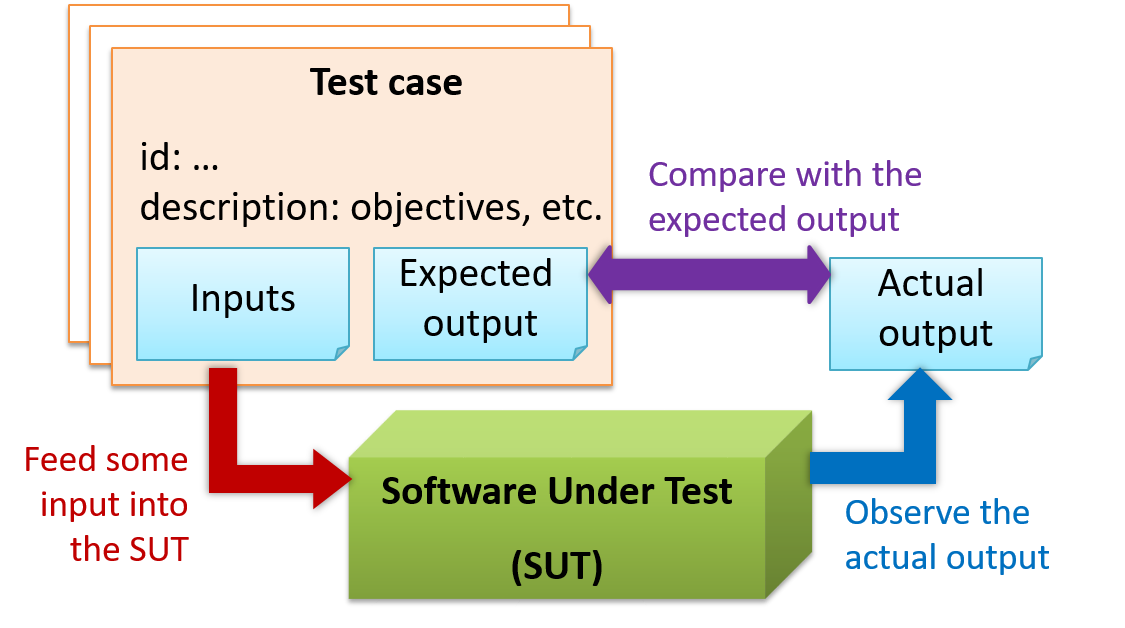
When testing, execute set of test cases.
- Test case specifies how to perform a test. At a minimum, specifies input to the software under test (SUT) and expected behaviour.
- Test cases can be determined based on specification, reviewing similar existing systems or comparing to past behavior of the SUT.
- For each test case: 1. Feed input to SUT, 2. Observe actual output, 3. Compare with expected output.
- Testcase failure is mismatch between expected and actual behavior, indicate potential defect (bug) unless error is test case itself.
Elaborate test case can have other details such as:
- Unique Identifier (e.g. TC0034-a)
- Descriptive name: e.g. vertical scrollbar activation for long web pages
- Objectives: e.g. to check whether the vertical scrollbar is correctly activated when a long web page is loaded to the browser
- Classification information: e.g. priority - medium, category - UI features
- Cleanup, if any: e.g. empty the browser cache.
Software testing consists of the dynamic verification that a program provides expected behaviors on a finite set of test cases, suitably selected from the usually infinite execution domain
- Dynamic: Testing involves executing the software. It is not by examining the code statically.
- Finite: In most non-trivial cases there are potentially infinite test scenarios but resource constraints dictate that we can test only a finite number of scenarios.
- Selected: In most cases it is not possible to test all scenarios. That means we need to select what scenarios to test.
- Expected: Testing requires some knowledge of how the software is expected to behave.
Regression Testing
Regression: When you modify a system, the modification may result in some unintended and undesirable effects on the system. Such an effect is called a regression. Regression testing is the re-testing of the software to detect regressions. The typical way to detect regressions is retesting all related components, even if they had been tested before.
- More effective when it is done frequently, after each small change. However, doing so can be prohibitively expensive if testing is done manually. Hence, regression testing is more practical when it is automated.
Test Automation
An automated test case can be run programmatically and the result of the test case (pass or fail) is determined programmatically.
Compared to manual testing, automated testing reduces the effort required to run tests repeatedly and increases precision of testing (because manual testing is susceptible to human errors).
Automated Testing of CLI applications
A simple way to semi-automate testing of a CLI (Command Line Interface) app is by using input/output re-direction.
Here are the high-level steps:
- Feed the app with a sequence of test inputs that is stored in a file while redirecting the output to another file.
- Next, you compare the actual output file with another file containing the expected output.
Example:
- Testing a CLI app called AddressBook.
- Store the test input in the text file input.txt.
- Store the output you expect in another text file expected.txt.
- Run program, redirect the text in input.txt as the input to AddressBook and redirect the output of AddressBook to a text file output.txt. Note that this does not require any changes in AddressBook code.
java AddressBook < input.txt > output.txt. The way to run a CLI program differs based on the language. e.g., In Python, assuming the code is in AddressBook.py file, use the commandpython AddressBook.py < input.txt > output.txt- If you are using Windows, use a normal MS-DOS terminal (i.e., cmd.exe) to run the app, not a PowerShell window.
- Next, compare output.txt with the expected.txt.
- This can be done using a utility such as Windows’ FC (i.e. File Compare) command, Unix’s diff command, or a GUI tool such as WinMerge.
FC output.txt expected.txt
- Note above technique is only suitable when testing CLI apps, and only if the exact output can be predetermined.
- If the output varies from one run to the other (e.g. it contains a time stamp), this technique will not work. In those cases, you need more sophisticated ways of automating tests.
End of topics Week 2.
CS2103T Week 3 Topics
Main topics are:
- RCS: Branching, Creating Pull Requests
- Automating the Build Process
- Java: JavaDoc, file I/O, packages, JARs
- Code Quality: Coding Standards
- Developer Testing
- Unit Testing
Having testcases allow us to not be scared of our code, and confidently put out new releases. (Gives you confidence and control).
SE Pitfalls:
- Pitfall 1: SE theory is not complex. But SE practice is hard. Pitfall is underestimating the effort required or thinking it is like other NUS courses. SE is fuzzy and subjective, no clear-cut rules to follow. Learn to make good judgement calls.
- Pitfall 2: There is no ‘correct’ solution for every SE problem.
- Pitfall 3: Opting for binge-and-purge strategy
- To avoid these pitfalls:
- Information Retention
- Fluency in SE practices
- Competency in SE.
RCS: Branching, Pull Requests
Branching:
- Branching is the process of evolving multiple versions of software in parallel.
- A branch can be merged into another branch. (Resulting in new commit representing changes with merge).
- Use
branchto do multiple parallel changes. A git branch is simply a named label pointing to a commit.headlabel indicates which branch you are on. - Dealing with merge conflicts: When two incompatible versions combined, required to resolve conflict by editing the file.
- When working with remote branches, we can link git branches in local repo to a remote repo.
git push -u origin <new-branch-name>to push a new local branch to remote repo, and to-utrack the remote branch.git branch -ato view the branch to pull, andgit switch -c branch1 myfork/branch1to create matching local repo and switch to it.
- To sync branches,
git push origin <branch-name>to push new local changes, andgit checkout <branch-name>,git pull origin <branch-name>to switch to branch and pull new changes from remote to local branch.
Pull Requests:
- Applicable to GitHub repo, initiate PR creation on Github.
- Using PRs allow you or others to review th PRs.
Refer to the git learning trail for details on branching, PRs.
Automating the Build Process
Integration is the act of combining parts of a software product to form a whole. It is also one of the most troublesome tasks, rarely goes smoothly.
Build automation tools can automate the steps of the build process, usually by means of build scripts.
- In a non-trivial project, building product can be a complex multi-step process. (e.g. pull code, link, run tests, update release documents, package into distributable, push to repo, deploy to server, delete temp files, etc). Furthermore, build may be done ‘on demand’, schedule or triggered by various events.
- Some of these build events are already automated in most modern IDEs. However,big projects use specialized build tools to automate complex build processes.
- E.g. Gradle, Maven, Apache Ant, GNU Make (Java), Grunt (JS), Rake (Ruby)
- Some build tools also serve as dependency management tools.
- They help to download correct versions of required libraries and update them regularly.
- Continuous Integration and Continuous Deployment:
- Continuous integration (CI) is an extreme application of build automation, where integration, building and testing happens auto after each code change.
- Continuous Deployment (CD) is where changes are not only integrated continuously, but also deployed to end-users at the same time. (E.g. GitHub Actions, Travis, Jenkins)
Java: JavaDoc, file I/O, packages, JARs
JavaDoc Documentation:
JavaDoc is a tool for generating API documentation in HTML format from comments in source code. Modern IDEs also use JavaDoc comments to generate explanatory tooltips.
1
2
3
4
5
6
7
8
9
10
11
12
13
14
15
16
17
18
19
20
21
22
23
24
25
26
27
28
// Example JavaDoc Comment for methods:
/**
 * Returns lateral location of the specified position.
 * If the position is unset, NaN is returned.
 *
 * @param x X coordinate of position.
 * @param y Y coordinate of position.
 * @param zone Zone of position.
 * @return Lateral location.
 * @throws IllegalArgumentException If zone is <= 0.
 */
public double computeLocation(double x, double y, int zone)
    throws IllegalArgumentException {
    // ...
}

// Example JavaDoc comment for classes:
package ...

import ...

/**
 * Represents a location in a 2D space. A <code>Point</code> object corresponds to
 * a coordinate represented by two integers e.g., <code>3,6</code>
 */
public class Point {
    // ...
}
File Access I/O
Use the java.io.File class to represent a file object. It can be used to access properties of the file object.
- See the example code the creates a
Fileobject to represent a filefruits.txtthat exists in thedatadirection relative to the current working directory. ```java import java.io.File;
public class FileClassDemo {
1
2
3
4
5
6
public static void main(String[] args) {
    File f = new File("data/fruits.txt");
    System.out.println("full path: " + f.getAbsolutePath());
    System.out.println("file exists?: " + f.exists());
    System.out.println("is Directory?: " + f.isDirectory());
}
}
1
2
3
4
5
6
7
8
9
10
11
12
13
14
15
16
17
18
19
20
21
22
23
24
25
26

* Also, read from a file using a `Scanner` object that uses a `File` object as the source of data.
``` java
import java.io.File;
import java.io.FileNotFoundException;
import java.util.Scanner;

public class FileReadingDemo {

    private static void printFileContents(String filePath) throws FileNotFoundException {
        File f = new File(filePath); // create a File for the given file path
        Scanner s = new Scanner(f); // create a Scanner using the File as the source
        while (s.hasNext()) {
            System.out.println(s.nextLine());
        }
    }

    public static void main(String[] args) {
        try {
            printFileContents("data/fruits.txt");
        } catch (FileNotFoundException e) {
            System.out.println("File not found");
        }
    }

}
- Use
java.io.FileWriterobject to write to a file. Remember to call theclose()method for writing operation to be completed. - Can also create a
FileWriterobject that appends to the file (instead of overwriting the current content) by specifying an additional boolean parameter to the constructor. java.nio.file.Filesis a utility class that provides several useful file operations. It relies on thejava.nio.file.Pathsfile to generate Path objects that represent file paths. ```java import java.io.FileWriter; import java.io.IOException;
public class FileWritingDemo {
1
2
3
4
5
6
7
8
9
10
11
12
13
14
15
16
17
18
19
20
private static void writeToFile(String filePath, String textToAdd) throws IOException {
    FileWriter fw = new FileWriter(filePath);
    fw.write(textToAdd);
    fw.close();
}

public static void main(String[] args) {
    String file2 = "temp/lines.txt";
    try {
        writeToFile(file2, "first line" + System.lineSeparator() + "second line");
    } catch (IOException e) {
        System.out.println("Something went wrong: " + e.getMessage());
    }
}

private static void appendToFile(String filePath, String textToAppend) throws IOException {
    FileWriter fw = new FileWriter(filePath, true); // create a FileWriter in append mode
    fw.write(textToAppend);
    fw.close();
} } ```
Packages
Organize your types (i.e., classes, interfaces, enumerations, etc.) into packages for easier management (among other benefits).
- To create package, put package statement at top of every source file in that package. The package statement must be the first line in the source file and there can be no more than one package statement in each source file.
- Furthermore, the package of a type should match the folder path of the source file. Similarly, the compiler will put the .class files in a folder structure that matches the package names.
The Formatter class below (in
<source folder>/seedu/tojava/util/Formatter.javafile) is in the packageseedu.tojava.util. When it is compiled, theFormatter.classfile will be in the location<compiler output folder>/seedu/tojava/util: ```java package seedu.tojava.util;
public class Formatter { public static final String PREFIX = “»”;
1
2
3
4
5
public static String format(String s){
    return PREFIX + s;
} } ``` * Package names are written in all lower case, using dot as separator. * To use a public package member from outside its package, either:
* Use fully qualified name to refer to the member. (E.g. `seedu.tojava.logic.Processor`)
* Import the package or the specific package member. (E.g. `import seedu.tojava.util.StringParser;`) * Importing a package does not import its sub-packages. * If you do not use a package statement, your type doesn't have a package -- a practice not recommended * Optionally, a static import can be used to import static members of a type so that the imported members can be used without specifying the type name. * When using the commandline to compile/run Java, you should take the package into account.
Using Jar Files
Java applications are typically delivered as JAR (short for Java Archive) files. A JAR contains Java classes and other resources (icons, media files, etc.).
An executable JAR file can be launched using the java -jar command e.g., java -jar foo.jar launches the foo.jar file.
The IDE or build tools such as Gradle can help you to package your application as a JAR file.
See the tutorial Working with JAR files @se-edu/guides to learn how to create and use JAR files.
Code Quality: Coding standards.
Production code needs to be of high quality. Given how the world is becoming increasingly dependent on software, poor quality code is something no one can afford to tolerate.
- One essential way to improve code quality is to follow a consistent style. That is why software engineers usually follow a strict coding standard (aka style guide).
- Aim of a coding standard is to make the entire code base look like it was written by one person.
- Coding standard is usually specific to a programming language.
- Important that whole team/company uses the same coding standard and that the standard is generally not inconsistent with typical industry practices.
- IDEs can help to enforce some parts of a coding standard e.g. indentation rules.
The link for Java Coding Standard for this course.
Developer Testing
- Developer testing is the testing done by the developers themselves as opposed to dedicated testers or end-users.
- Early developer testing is essential. Delaying testing until the full product complete is disadvantagous.
- Locating cause of test case failure is difficult due to larger search space, failure may also be due to multiple inter-related bugs.
- Fixing bug found during such testing could result in major rework.
- One bug might ‘hide’ other bugs, which could emerge only after the first bug is fixed.
- Delivery may have to be delayed if too many bugs are found during testing.
- It is better to do early testing. Such early testing software is usually, and often by necessity, done by the developers themselves i.e., developer testing.
Unit Testing
Test Automation using test drivers.
- A test driver is the code that ‘drives’ the SUT (software under test) for the purpose of testing i.e. invoking the SUT with test inputs and verifying if the behavior is as expected.
PayrollTest‘drives’ thePayrollclass by sending it test inputs and verifies if the output is as expected. ```java public class PayrollTest { public static void main(String[] args) throws Exception {
1
2
3
4
5
6
7
8
9
10
11
12
13
14
15
16
17
18
19
20
    // test setup
    Payroll p = new Payroll();

    // test case 1
    p.setEmployees(new String[]{"E001", "E002"});
    // automatically verify the response
    if (p.totalSalary() != 6400) {
        throw new Error("case 1 failed ");
    }

    // test case 2
    p.setEmployees(new String[]{"E001"});
    if (p.totalSalary() != 2300) {
        throw new Error("case 2 failed ");
    }

    // more tests...

    System.out.println("All tests passed");
} } ```
- JUnit is a tool for automated testing of Java programs. Similar tools are available for other languages and for automating different types of testing.
- Most IDEs have integrated support for testing tools.
Unit Testing: Unit testing: testing individual units (methods, classes, subsystems, …) to ensure each piece works correctly.
- In OOP code, common to write one or more unit tests for each public method of a class.
JUnit Basics
- When writing JUnit tests for a class
Foo, the common practice is to create aFooTestclass, which will contain various test methods for testing methods of theFooclass. - Each test method is marked with a @Test annotation.
- Tests use
assertEquals(expected, actual)methods (provided by JUnit) to compare the expected output with the actual output. If they do not match, the test will fail.- JUnit comes with other similar methods such as
assertNull,assertNotNull,assertTrue,assertFalseetc. [more …] - Java code normally use camelCase for method names e.g., testStringConversion but when writing test methods, sometimes another convention is used:
unitBeingTested_descriptionOfTestInputs_expectedOutcome, e.g.,intDivision_zeroDivisor_exceptionThrown.
- JUnit comes with other similar methods such as
- Several ways to verify the code throws the correct exception.
- What to test for when writing tests? Goal is to catch bugs, testing using inputs that can trigger a potentially buggy path in the code.
Stubs
- A proper unit test requires the unit to be tested in isolation so that bugs in the dependencies cannot influence the test i.e. bugs outside of the unit should not affect the unit tests.
- Stubs can isolate the SUT from its dependencies.
- Stub: A stub has the same interface as the component it replaces, but its implementation is so simple that it is unlikely to have any bugs.
JUnit Intermediate
Other noteworthy JUnit concepts as per JUnit 5 User Guide include:
- Annotations: In addition to the @Test annotation you’ve seen already, there are many other annotations in JUnit. For example, the @Disabled annotation can be used to disable a test temporarily.
- Pre/post-test tasks, Conditional test execution.
- Assumptions: specify assumptions that must hold for a test to be executed.
- Tagging tests: It is possible to tag tests (e.g., @Tag(“slow”) so that tests can be selected based on tags.
- Test execution order: By default, JUnit executes test classes and methods in a deterministic but intentionally nonobvious order. This ensures that subsequent runs of a test suite execute tests in the same order, thereby allowing for repeatable builds. But it is possible to specify a specific testing order.
- Test hierarchies: Normally, we organize tests into separate test classes. If a more hierarchical structure is needed, the @Nested annotation can be used to express the relationship among groups of tests.
- Repeated tests, Parameterized tests, Dynamic tests, Timeouts, Parallel execution.
- Extensions: JUnit supports third-party extensions.