MarkBind Command Line Interface
packages\cli Package
Here is a component diagram of MarkBind CLI
MarkBind makes use of the commander.js npm package to build its CLI application, which simplifies the defining, parsing, of commands and adding options.
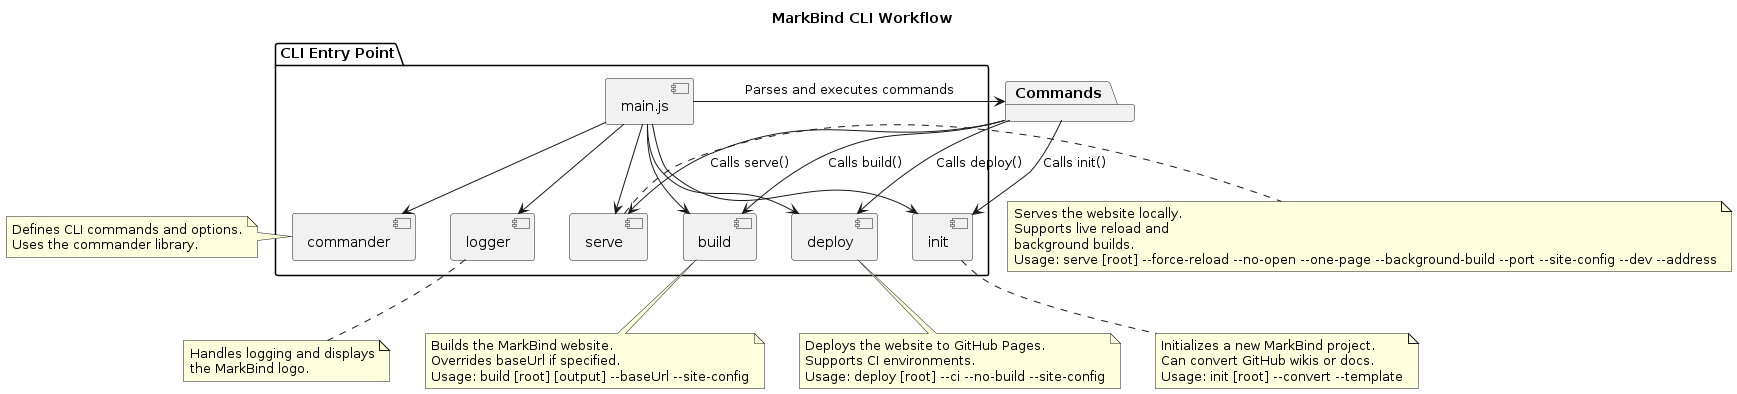
The command line supports a total of 4 commands. init, serve, build and deploy.
Each command is refactored into the cli/src/cmd folder.
1. markbind Init
Here is an activity diagram depicting the init function.
When we run markbind init, we call the async function init(root, options). This function creates a new Template object, which either initalizes a new markbind project, or converts existing documentation into a markbind project.
2. markbind serve
The markbind serve command is used to preview a MarkBind site locally while actively developing it. It performs three main tasks: building the site, starting a local web server, and enabling live preview with automatic updates. By default, it generates the website in a _site directory and serves it at http://127.0.0.1:8080, allowing the user to view changes in real-time.
Here is a sequence diagram of the general mechanism of markbind serve.
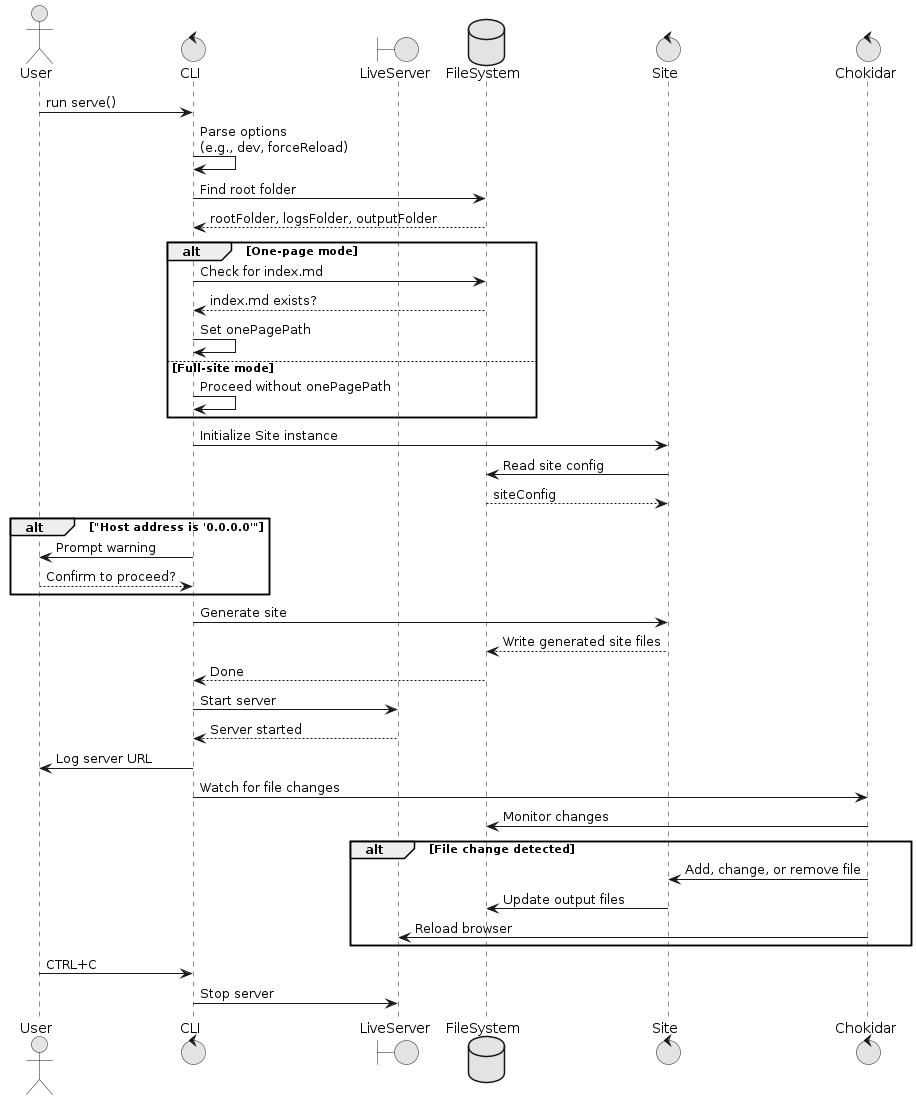
Some notable entities:
chokidaris a minimal and efficent cross-platform file watching library.live-serveris a minimal development server with live reload capability.
In the serve function, it starts by parsing the command line options, finds the root folder and verifies required files.
It then initializes a Site object, reads the site configuration and generates the website.
Site Generation and Local Server
When executed, markbind serve first finds the root directory (either specified by the user or the current working directory). It then reads the site's configuration from site.json (or another file if specified using -s) and generates the initial static site. The generated files are placed in the _site folder, which acts as the server's root directory. The command then starts a lightweight web server using live-server, making the website accessible locally. If the --no-open (-n) option is not set, it automatically opens the website in the browser.
Live Preview and File Watching
A key feature of markbind serve is its ability to detect file changes and update the site dynamically. It uses chokidar, a file-watching library, to track changes in source files and trigger updates accordingly. If a file is modified, deleted, or added, the server rebuilds only the affected pages, reducing build time. Additionally, the --force-reload (-f) option forces all files to be reprocessed, which is useful when making deep structural changes.
Optimized Single-Page Mode (--one-page)
For users working on specific pages, the --one-page (-o) option speeds up development by serving only a single page initially (defaulting to index.md if no file is specified). This minimizes unnecessary rebuilds, making the workflow faster. If the --background-build (-b) option is enabled, MarkBind will automatically generate the remaining pages in the background, ensuring that the site remains up-to-date without affecting the user’s ability to edit content.
3. markbind build
The build.js script is responsible for generating a static website using MarkBind.
It first determines the root directory by checking the user-specified input or defaulting to the current directory. If the --baseUrl option is provided, it either sets it to an empty string or the specified value. The script then identifies the output directory, defaulting to _site if none is provided. Using MarkBind’s Site class, it processes the files, applies configurations, and generates the static site. If the build is successful, it logs a success message; otherwise, it logs any errors and exits with a failure code.
Additionally, see Site Class for more details on the mechanism of generate().
4. markbind deploy
This command deploys the site to the repo's GitHub pages by generating the site and pyshing the generated site to gh-pages branch of the current git working directory's repo.
The deploy command in MarkBind starts by initializing the root directory, which defaults to the current working directory. It uses the cliUtil.findRootFolder() function to find the root folder based on the user-specified directory and site configuration. If an error occurs during this process, it logs the error and exits.
It then defines the output folder, which is typically the _site directory within the root folder.
The next step checks whether the --no-build flag is passed. If the flag is not provided, it triggers the site generation using site.generate(). This step builds the static site by processing source files into HTML and other assets.
Once the site is built (or if --no-build is specified), it deploys the site using site.deploy(options.ci). If the deployment is successful, it logs the deployment URL or simply indicates that the deployment has been completed.
If an error occurs during either the build or deployment process, the error is logged, and the process exits with an error code.
Site Instance for CLI
Most of the functionalities are abstracted into the Site instance, so a clear understanding of the Site instance is needed.
To summarize,
servemakes use ofSite.generate()buildmakes use ofSite.generate()deploymakes use ofSite.generate()andSite.deploy()
The CLI is simply an abstraction layer that allows users to interact with the MarkBind functionality through commands like markbind serve, markbind build, and markbind deploy. These commands ultimately rely on the Site instance, which is part of the core MarkBind functionality. The Site instance abstracts the process of building, serving, and deploying a static site.